Sizing the compression when you tune a replica is really about dialling it in to the working point where the replica runs best. In fact – there isn’t just one, but a full two such points, depending on what you want out of the replica. Now, knowing those points exist is one thing – finding them is quite another.
The old formula and its holes
The cylinder has always been sized against the barrel using that classic volume-ratio formula, which only takes into account the barrel volume, the cylinder volume and the BB weight. It works, granted a touch suboptimally – but the simulator showed something the formula can’t see: the optimum point is significantly affected by the piston mass, and even the spring power. Two gearboxes with an identical barrel and an identical cylinder, but a different piston, don’t share the same optimum. The old formula knows nothing about that – and the simulator turns up one more possible tuning point on top of it.
Why precise sizing is such a grind
Precise sizing doesn’t mean the factory “we measured too little power, drop in a stronger spring and off you go” that usually gets done with stock replicas, but hitting the combination where the piston doesn’t slam too loudly and the spring’s energy is put to best use. In practice it looks like this: install → assemble → measure → wonder why it’s off from the formula → open it up → correct → repeat. And again. And once more – until it works. Not fun.
The simulator moves that cycle into the computer – the result gets predicted and planned out, so the whole thing is done much sooner.
How Auto-Tune works
The Auto-Tune option works like this: alongside all the other fixed parameters of the replica you’ve measured (the piston, and the nozzle with the cylinder head), you enter the barrel length and inner diameter, the spring power and the BB mass you’ll be playing with most of the time – and the simulator finds on its own which cylinder runs best and how much, if at all, its port needs shifting.
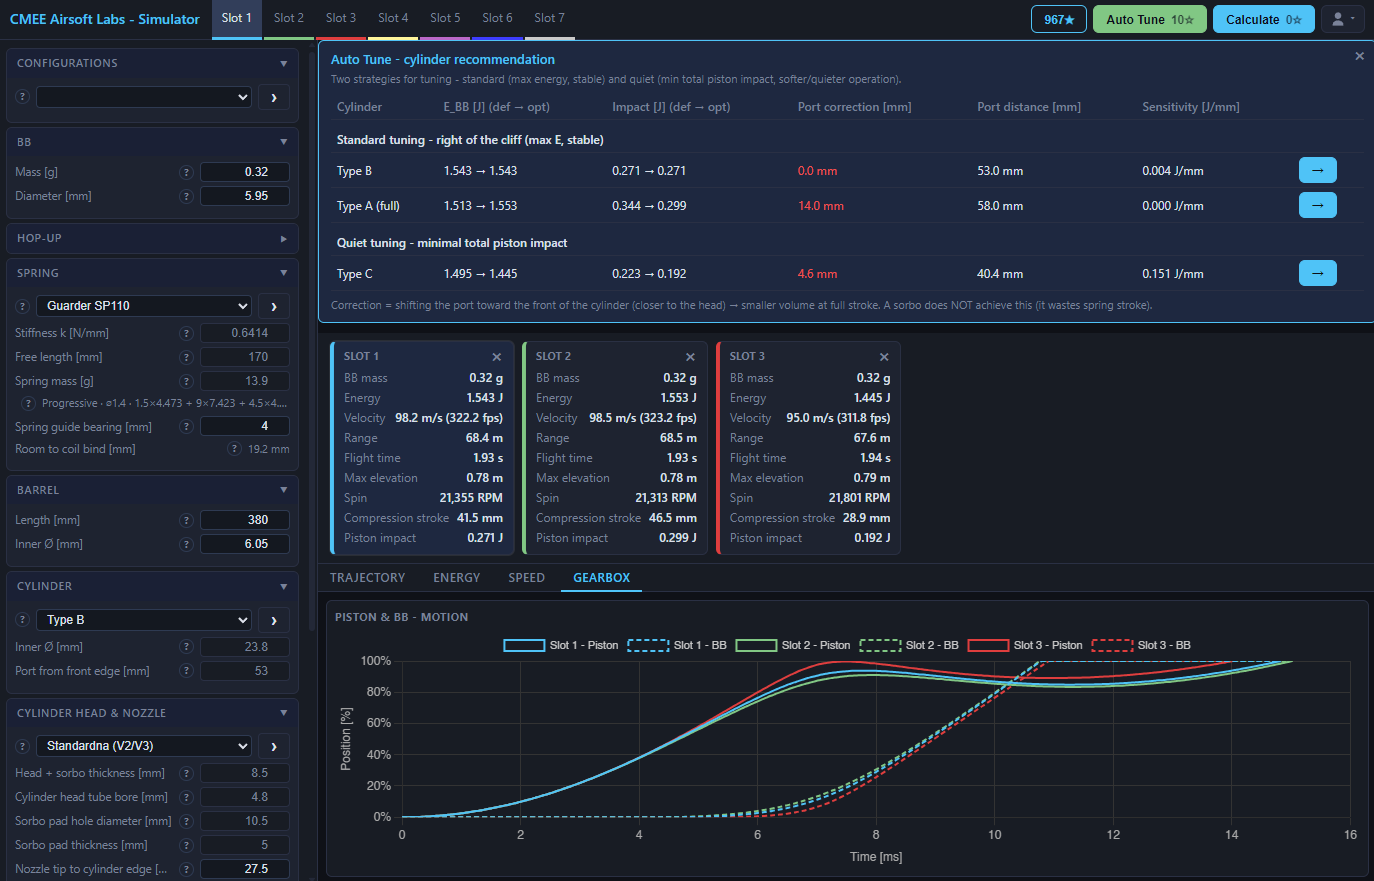
And this brings us back to the zones I wrote about in the Quiet zone article. That’s why Auto-Tune offers two strategies:
- Quiet tuning looks for the port position with the quietest total piston slam – summed over every impact, including the delayed return one, after the gas shoves the piston back near the end of its travel and the spring then drives it back onto the cylinder head. The result is a quieter replica, at a little less energy than in the regular zone. But it’s more sensitive: the minimum sits right up against a wall, past which the slam jumps sharply and the energy drops. That’s why Auto-Tune nudges its recommendation away from the wall by a “Port safety margin” (a setting, 1 mm by default, towards the larger port) and, alongside it, prints the sensitivity [J/mm] – the steepness of that wall – so you know how much a miss can cost you if you grind the port too far.
- Standard tuning gives results closer to the existing way of sizing: it aims for maximum energy on a fairly flat stretch of the curve, so the replica is far less sensitive to variations and the output is more balanced. The piston slam is a touch louder, but the replica runs consistently – which is why it’s the more advisable pick, unless quiet is your priority. You get two offered results: one with one of the available cylinders you’ve defined in your presets, and another with one of those cylinders plus a port correction. That second one usually gives more energy, but calls for grinding the port by the calculated correction – whereas the first is the simpler solution that generally gives just a bit less energy.
Auto-Tune hands you all of it, so you decide which option to go with.
A regular calculation costs 1 credit, and Auto-Tune, since it churns through a whole series of simulations behind the scenes while hunting for the optimum, costs 10 credits. Still incomparably cheaper than opening the gearbox for the tenth time in one afternoon.